Exploring Domain Admin Attack Paths With BloodHound MCP
Introduction
BloodHound has become indispensable for investigating high-value access in modern AD environments. Instead of manually inspecting OU structures, ACLs or legacy groups, it creates relationship graphs that highlight real effective privileges. In this walkthrough, the Community Edition sample data serves as the foundation for understanding Domain Admin paths, nested group chains and misconfigurations. While the dataset is synthetic, its structure mimics real enterprise privilege patterns, providing an excellent base for practicing analysis techniques before using BloodHound against a live environment1.
Installation
- Step 1: Clone the Repository Start by obtaining the MCP server code from GitHub 2. In your terminal navigate to your working directory and run:
1
2
git clone https://github.com/mwnickerson/bloodhound_mcp.git
cd bloodhound_mcp
This gives you the full project locally, including the main script, dependencies configuration (pyproject.toml), and the example files.
- Step 2: Install Dependencies
This project requires Python 3.11 or newer and uses the
uvpackage manager (UltraViolet) for dependency management. After entering the project folder, install the dependencies by executing:
1
uv sync
This command reads the pyproject.toml and uv.lock files and installs the required packages into the environment. Ensure that Python path and uv are available in your shell.
- Step 3: Configure Environment Variables The MCP server requires you to set a few environment variables so it can connect to your BloodHound instance’s REST API. Create a file named .env in the root of the bloodhound_mcp folder with the following entries:
1
2
3
BLOODHOUND_DOMAIN=your-bloodhound-instance.domain.com
BLOODHOUND_TOKEN_ID=your-token-id
BLOODHOUND_TOKEN_KEY=your-token-key
Replace the placeholders with your actual BloodHound server’s domain name or IP address, and the token ID/key you generated in the BloodHound administration UI. Without these values filled in, the MCP server cannot authenticate and retrieve data.
- Step 4: Setting Up Integration with Claude Desktop (Optional but Recommended)
If you plan to use the MCP server via Claude Desktop (for natural‐language querying of BloodHound data), open Claude Desktop and navigate to Settings → Developer Tools. Add the following configuration to your
claude_desktop_config.jsonfile:
1
2
3
4
5
6
7
8
9
10
11
12
13
{
  "mcpServers": {
    "bloodhound_mcp": {
      "command": "uv",
      "args": [
        "--directory",
        "/path/to/your/bloodhound_mcp",
        "run",
        "main.py"
      ]
    }
  }
}
Modify /path/to/your/bloodhound_mcp to match the local path where you cloned the repository. After saving the configuration, restart Claude Desktop so that it recognizes the new MCP server configuration.
-
Step 5: Obtain Your BloodHound CE Instance and Token Setup Ensure you have a running BloodHound Community Edition or other compatible BloodHound server instance with your data imported (for example via SharpHound). Log into the BloodHound UI, navigate to Administration → API Tokens, and create a token with the appropriate permissions (users, groups, graph queries). Once created, copy the Token ID and Token Key into the .env file you prepared previously1.
-
Step 6: Launch the MCP Server With dependencies installed, environment variables configured, and BloodHound ready, start the MCP server by executing:
1
uv run main.py
You should see the server initialize and bind to its interface, listening for incoming requests from Claude Desktop or whatever client you’re using to access MCP. Logs should show successful connection to your BloodHound domain and token authentication.
-
Step 7: Verify Connectivity and Make a Sample Query In Claude Desktop (or via any HTTP/REST client if you prefer), you can begin interacting with the MCP server. For example, ask: “What domains are available in BloodHound?” The MCP server will forward the request to the BloodHound API, return a structured list of domains, and you will see the response in the client interface. This verifies that the entire pipeline—MCP server → BloodHound API → data retrieval—is functioning 2.
-
Step 8: Apply to Real Data and Produce Results Once the MCP server is operational, you can run natural-language queries or scripted interactions to explore your BloodHound dataset: find users, groups, identify shortest paths to Domain Admins, inspect SPNs, look for kerberoastable accounts and more1.
Usage
With all components connected—Claude as the front-end interface, the BloodHound MCP as the middleware, and BloodHound Community Edition as the underlying graph platform—the workflow becomes far more streamlined than a traditional manual BloodHound analysis. The CE sample dataset 3provided the base graph structure, while the MCP layer translated natural-language requests from Claude into precise API calls against the BloodHound CE backend. This integration transformed what is normally a series of Cypher queries and UI-driven clicks into a more conversational and guided exploration of the environment.
The moment the sample dataset finished ingesting, Claude was able to request the list of domains, enumerate high-value groups and map privilege relationships simply by asking. The MCP server parsed each request, issued the correct BloodHound API calls and returned structured results that Claude could interpret and summarize. This workflow made it easy to observe how administrative privileges were distributed: GHOST.CORP and WRAITH.CORP each held four Domain Admin accounts, while PHANTOM.CORP contained thirteen. Even without interacting directly with the BloodHound UI, Claude provided immediate insight into the imbalance and highlighted the likelihood of privilege sprawl within PHANTOM.CORP.
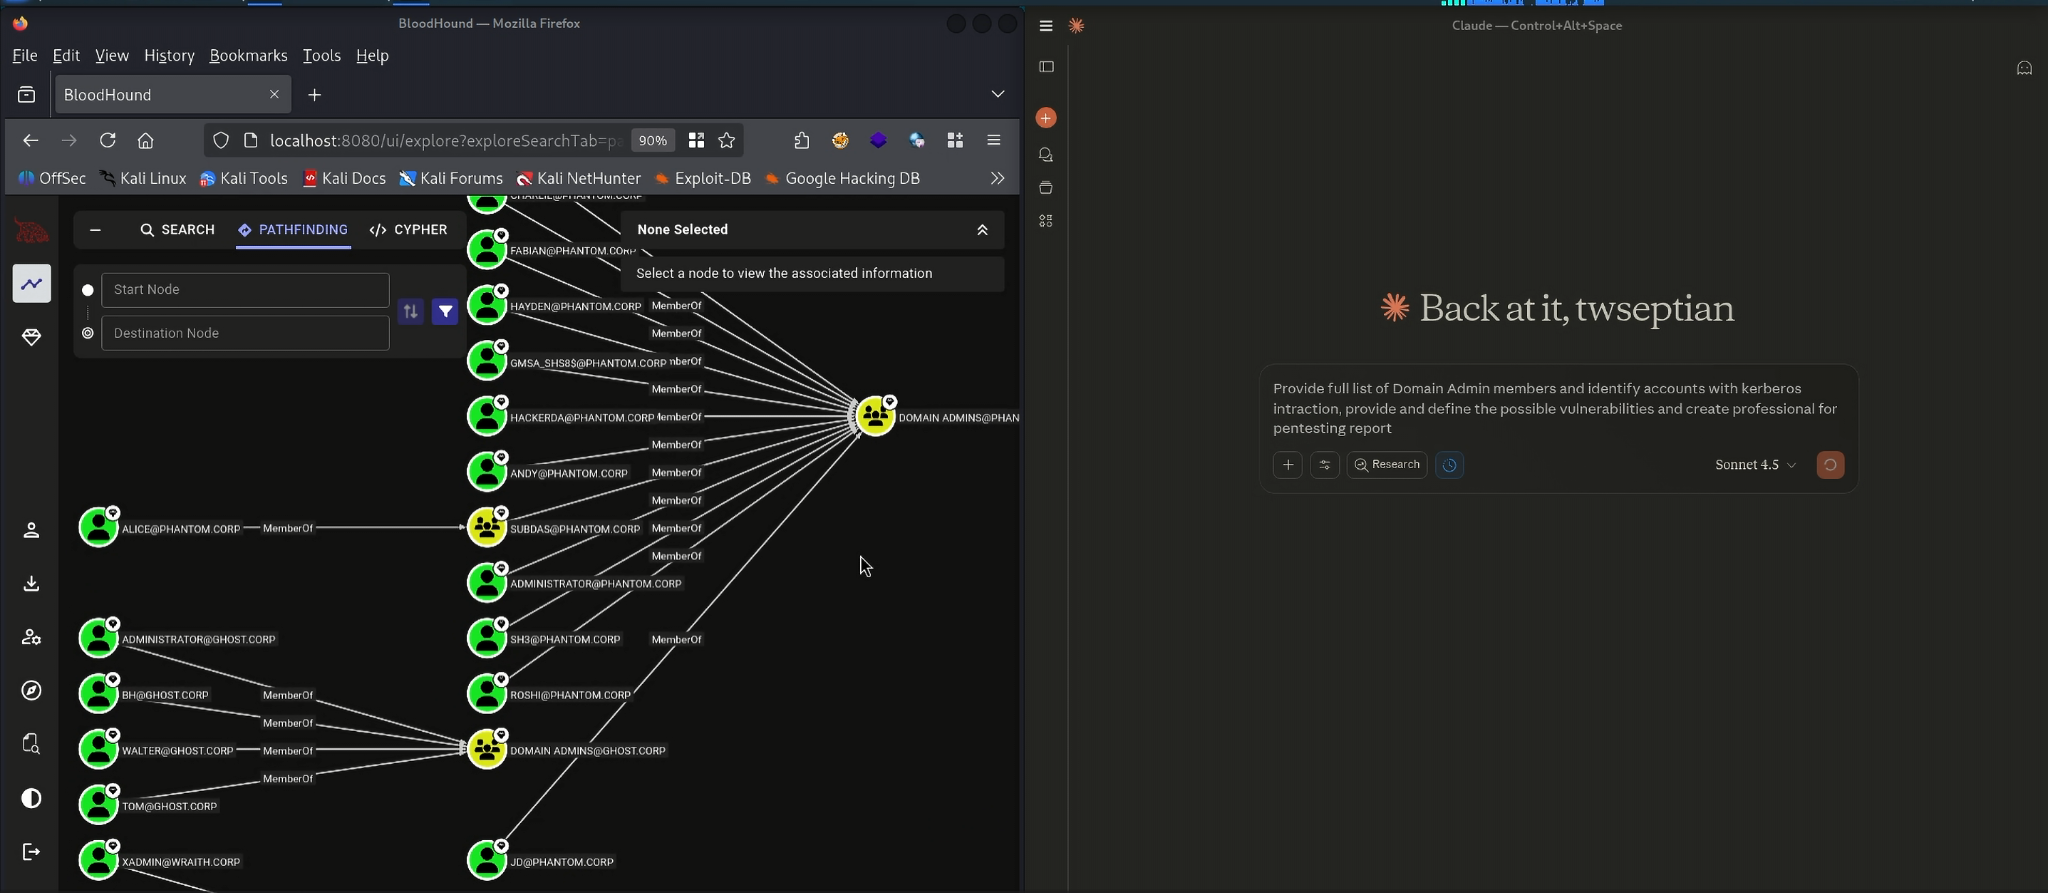 Claude & Bloodhound MCP Server Usage - Prompt Input
Expanding group-level paths through Claude was equally smooth. When asked to explain how a particular user or group obtained Domain Admin rights, the MCP server traced the inbound relationships in the graph and returned each hop in a readable structure. Claude converted these results into an explanation of the nested group chain, demonstrating how indirect inheritance within PHANTOM.CORP granted elevated rights through several intermediary groups. This kind of privilege stacking is exactly what BloodHound is designed to expose, and the MCP integration made the process feel more like guided analysis than raw graph interrogation2.
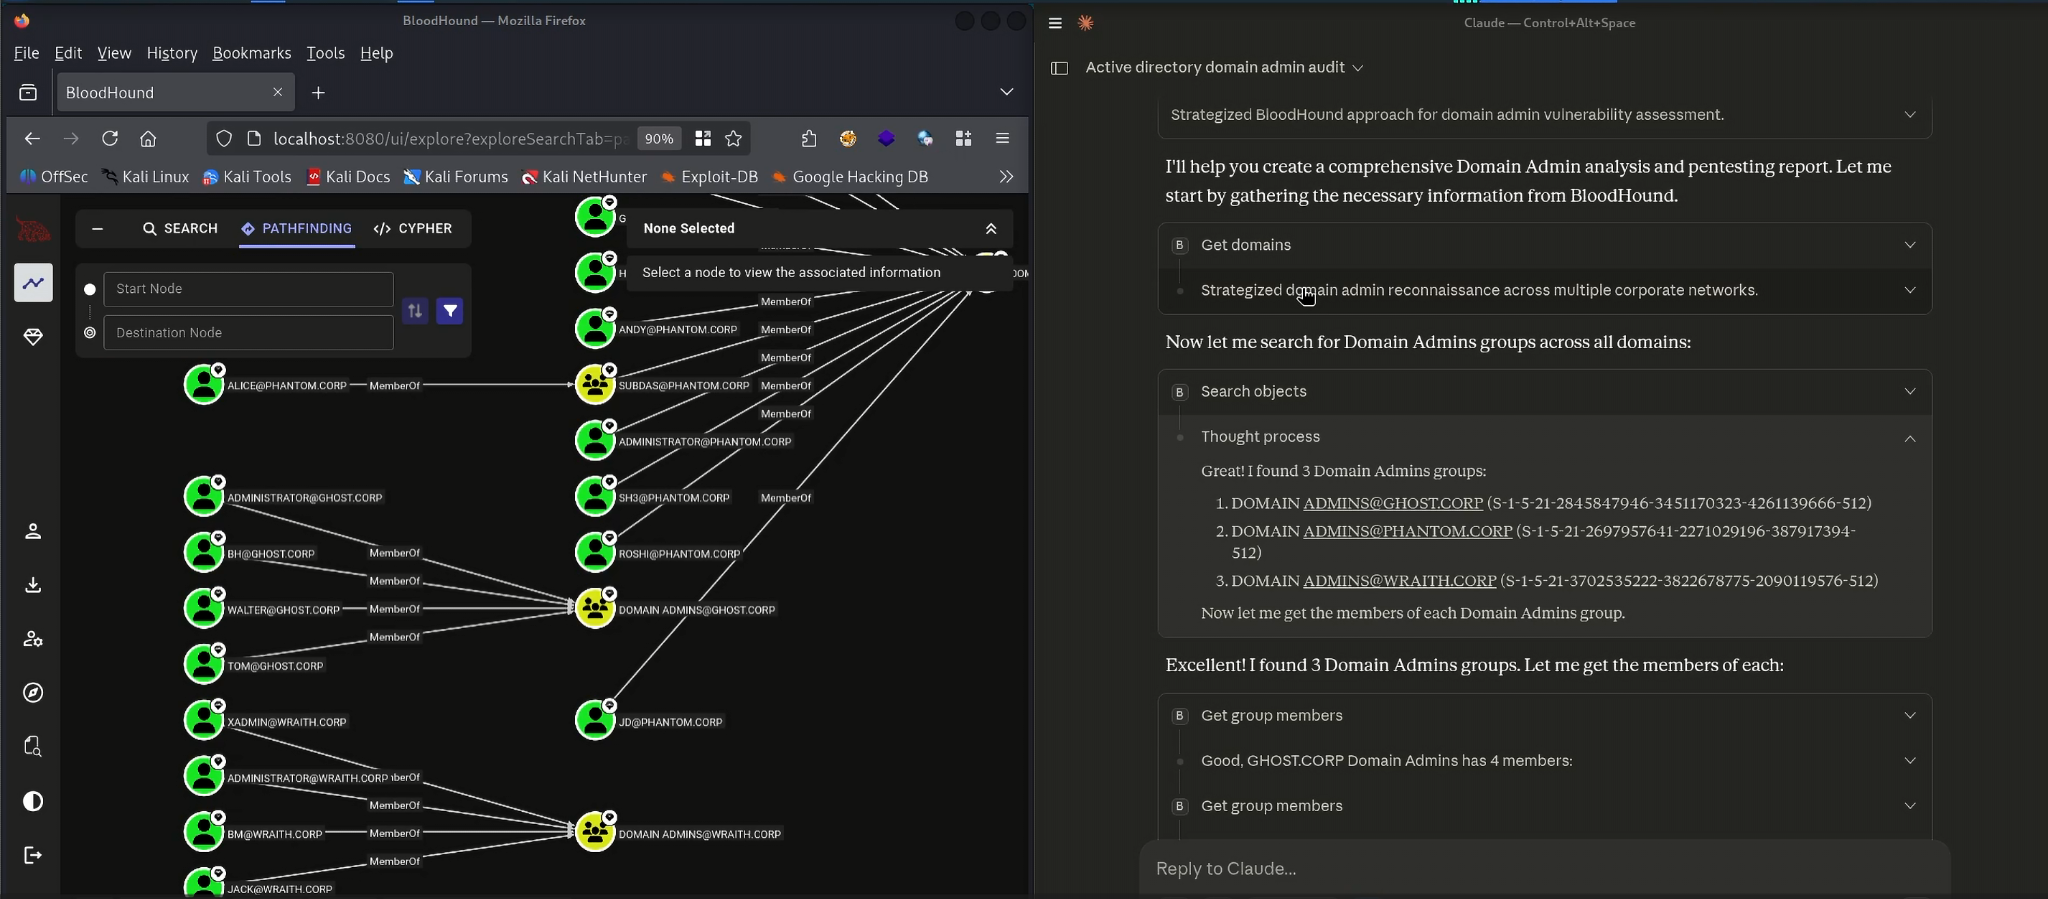 Claude & Bloodhound MCP Server Usage - Analyze BloodHound File
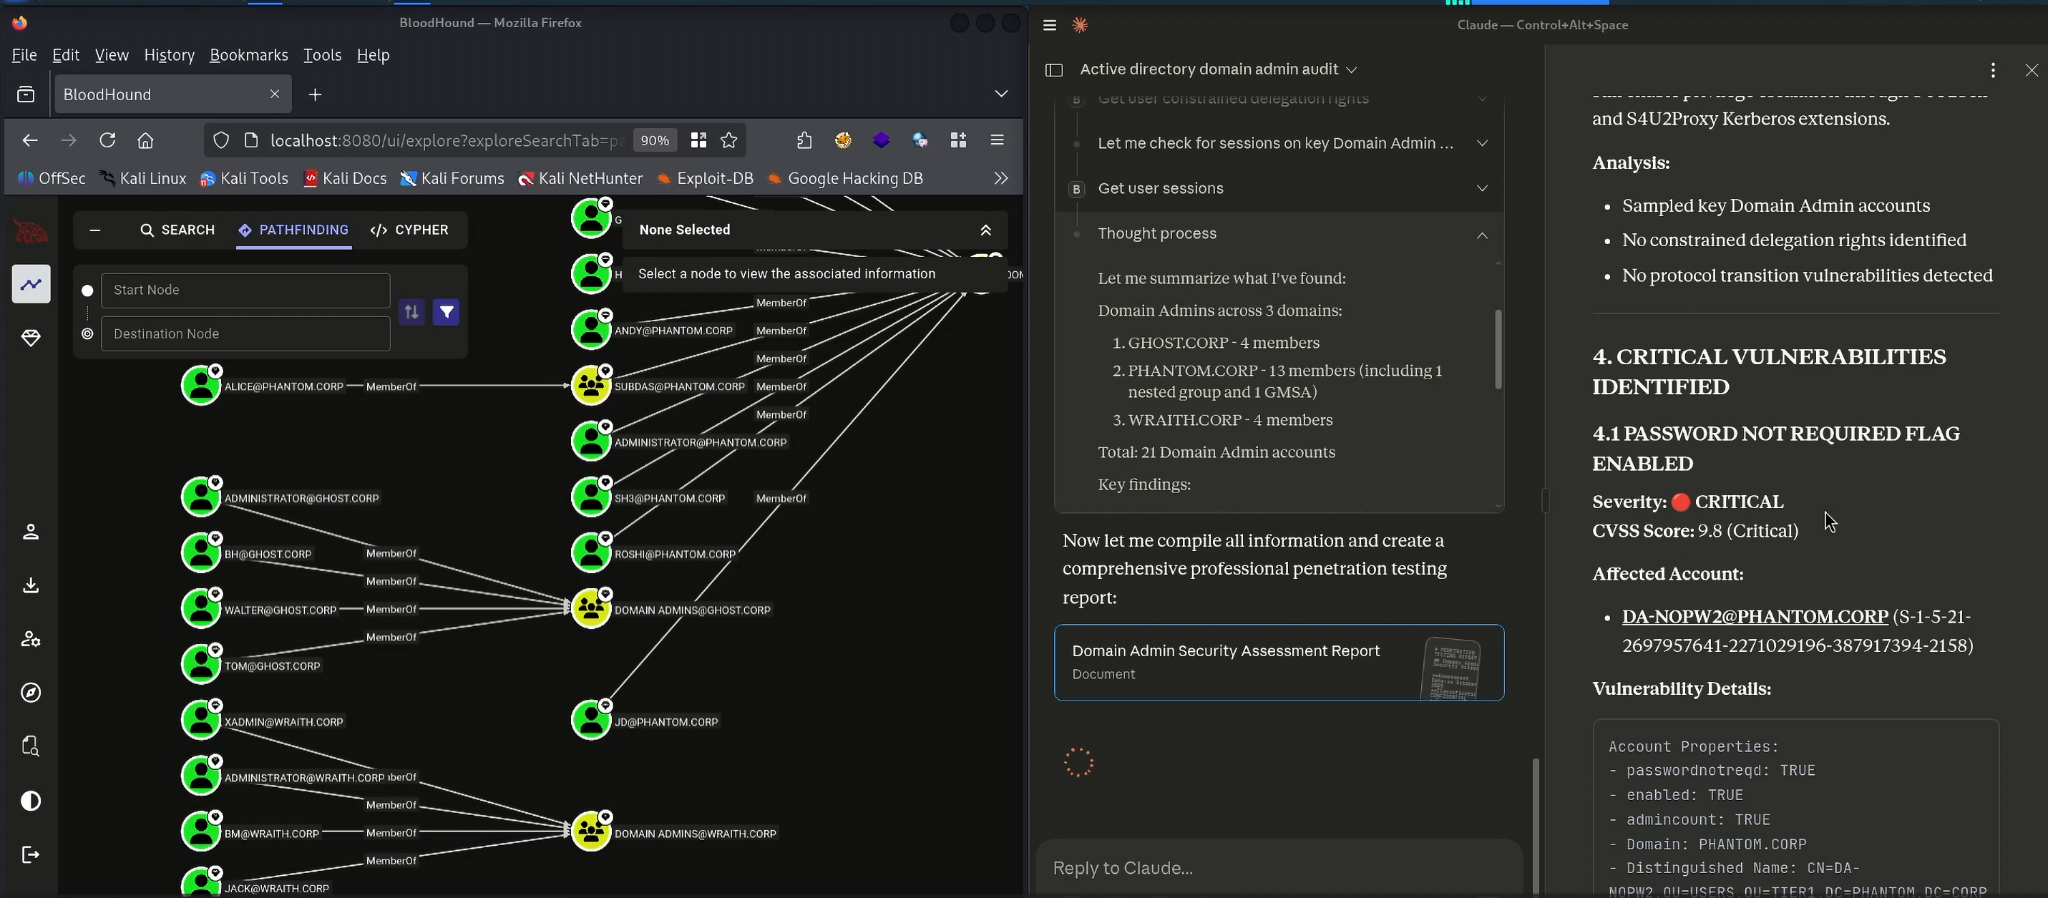
Claude also handled attribute-level inspection, which is normally performed inside the BloodHound UI. A simple request to “show risky Domain Admin attributes” prompted the MCP to query each account’s Kerberos settings, delegation flags and userAccountControl properties. This immediately surfaced the intentional misconfiguration baked into the CE dataset: a Domain Admin with the passwordnotreqd flag enabled. Claude highlighted the severity, explained the operational impact and placed this misconfiguration within the broader context of authentication weaknesses in Active Directory2.
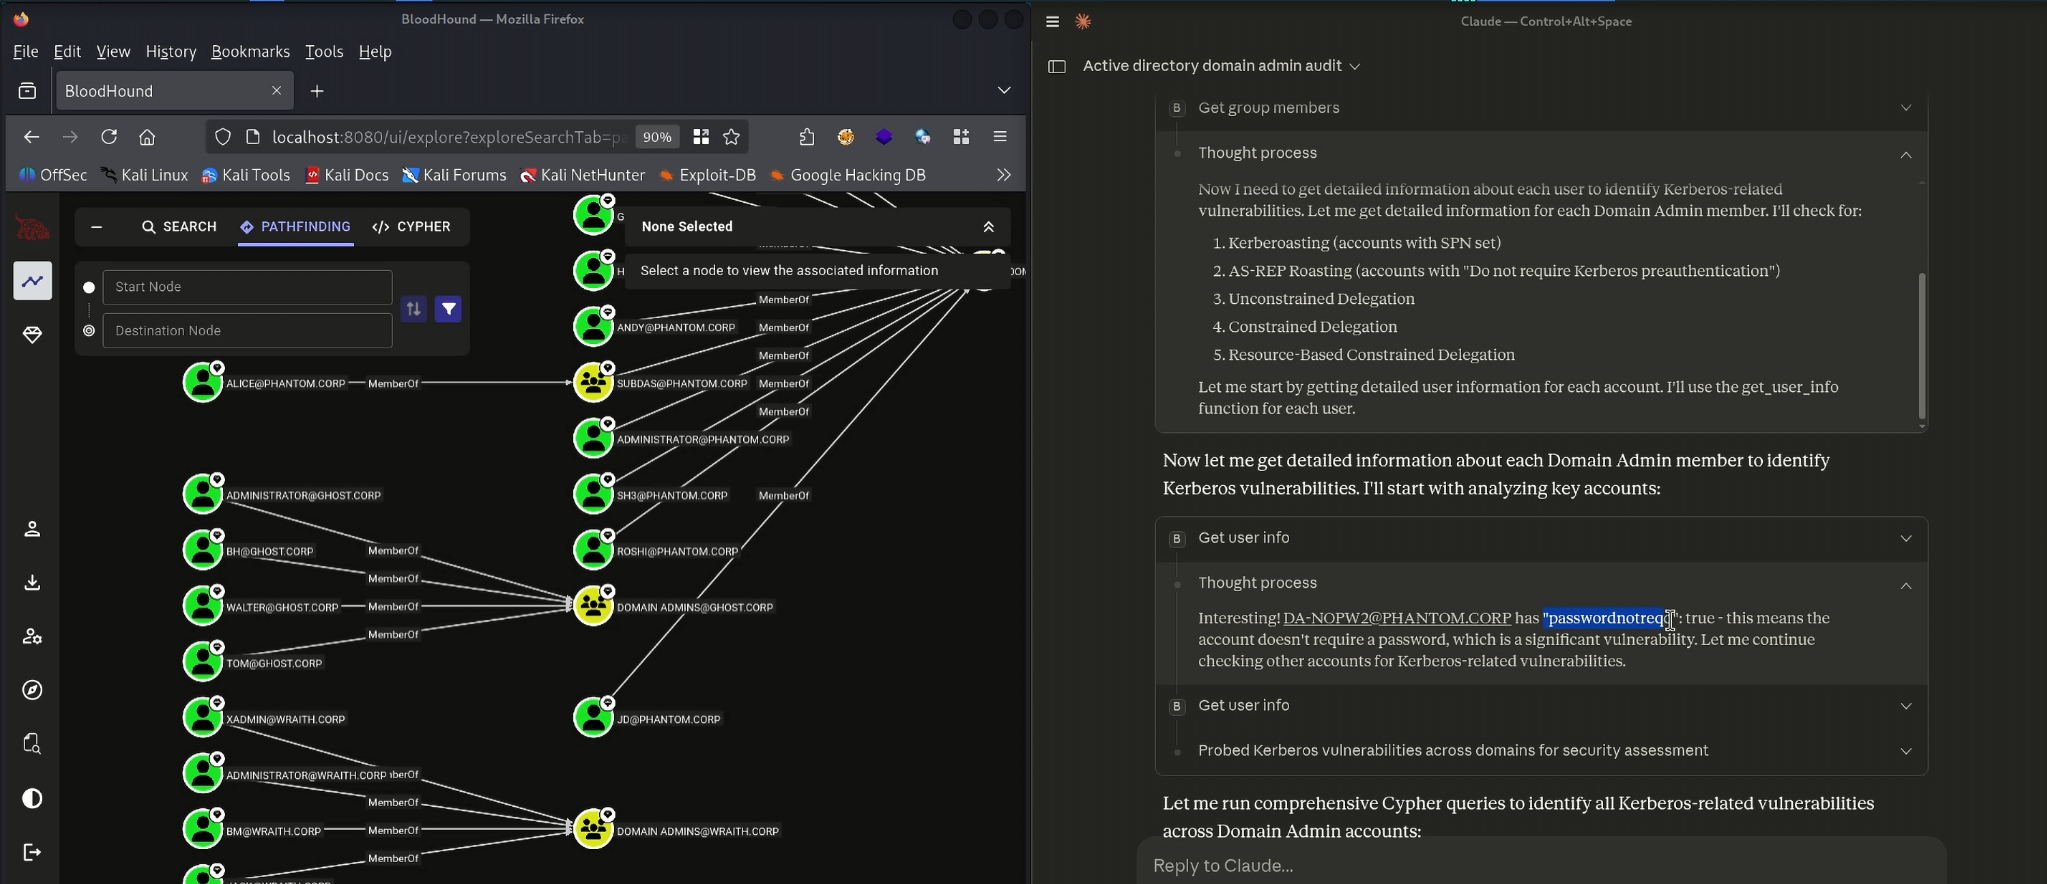 Claude & Bloodhound MCP Server Usage - Analyze Active Directory file from BloodHound Data
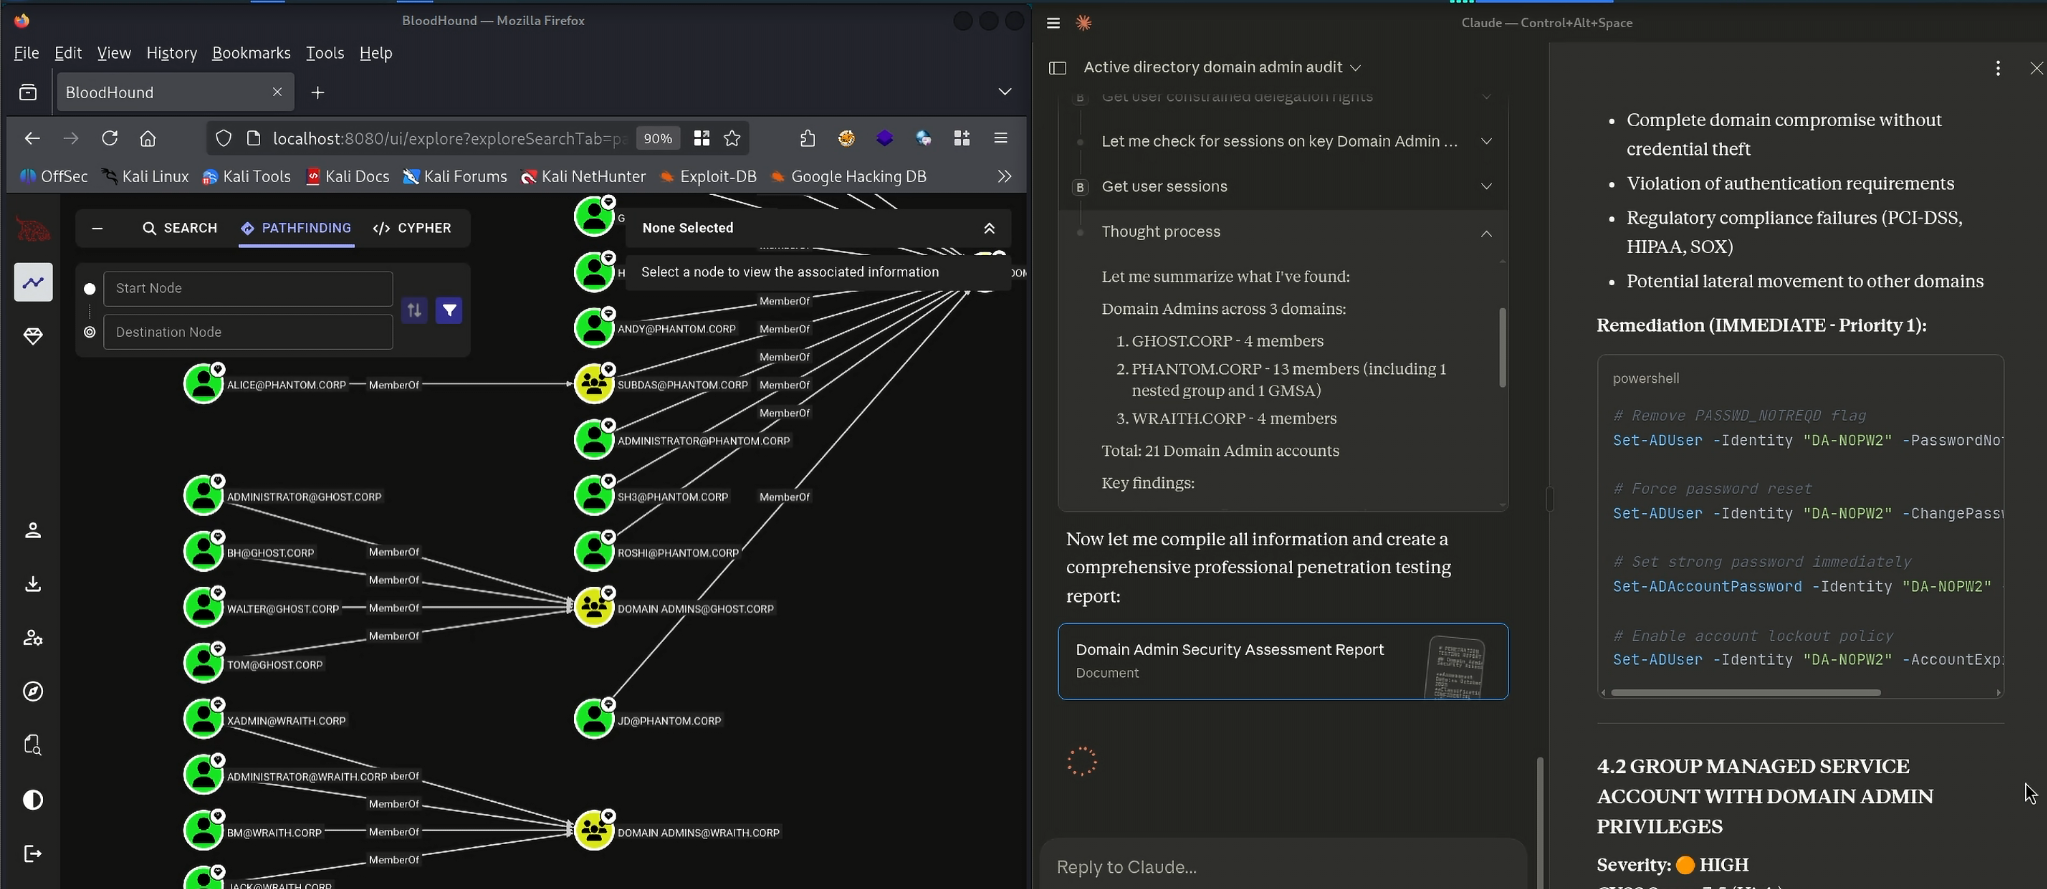
Throughout the workflow, the BloodHound UI served as a visual supplement. Whenever deeper graph exploration was needed—such as viewing the exact geometry of nested relationships or validating shortest-path routing—the interface provided the graphical confirmation that complemented Claude’s narrative summary. Meanwhile, the MCP served as the connective tissue, translating natural-language requests into BloodHound-compatible queries and returning clean, structured data.
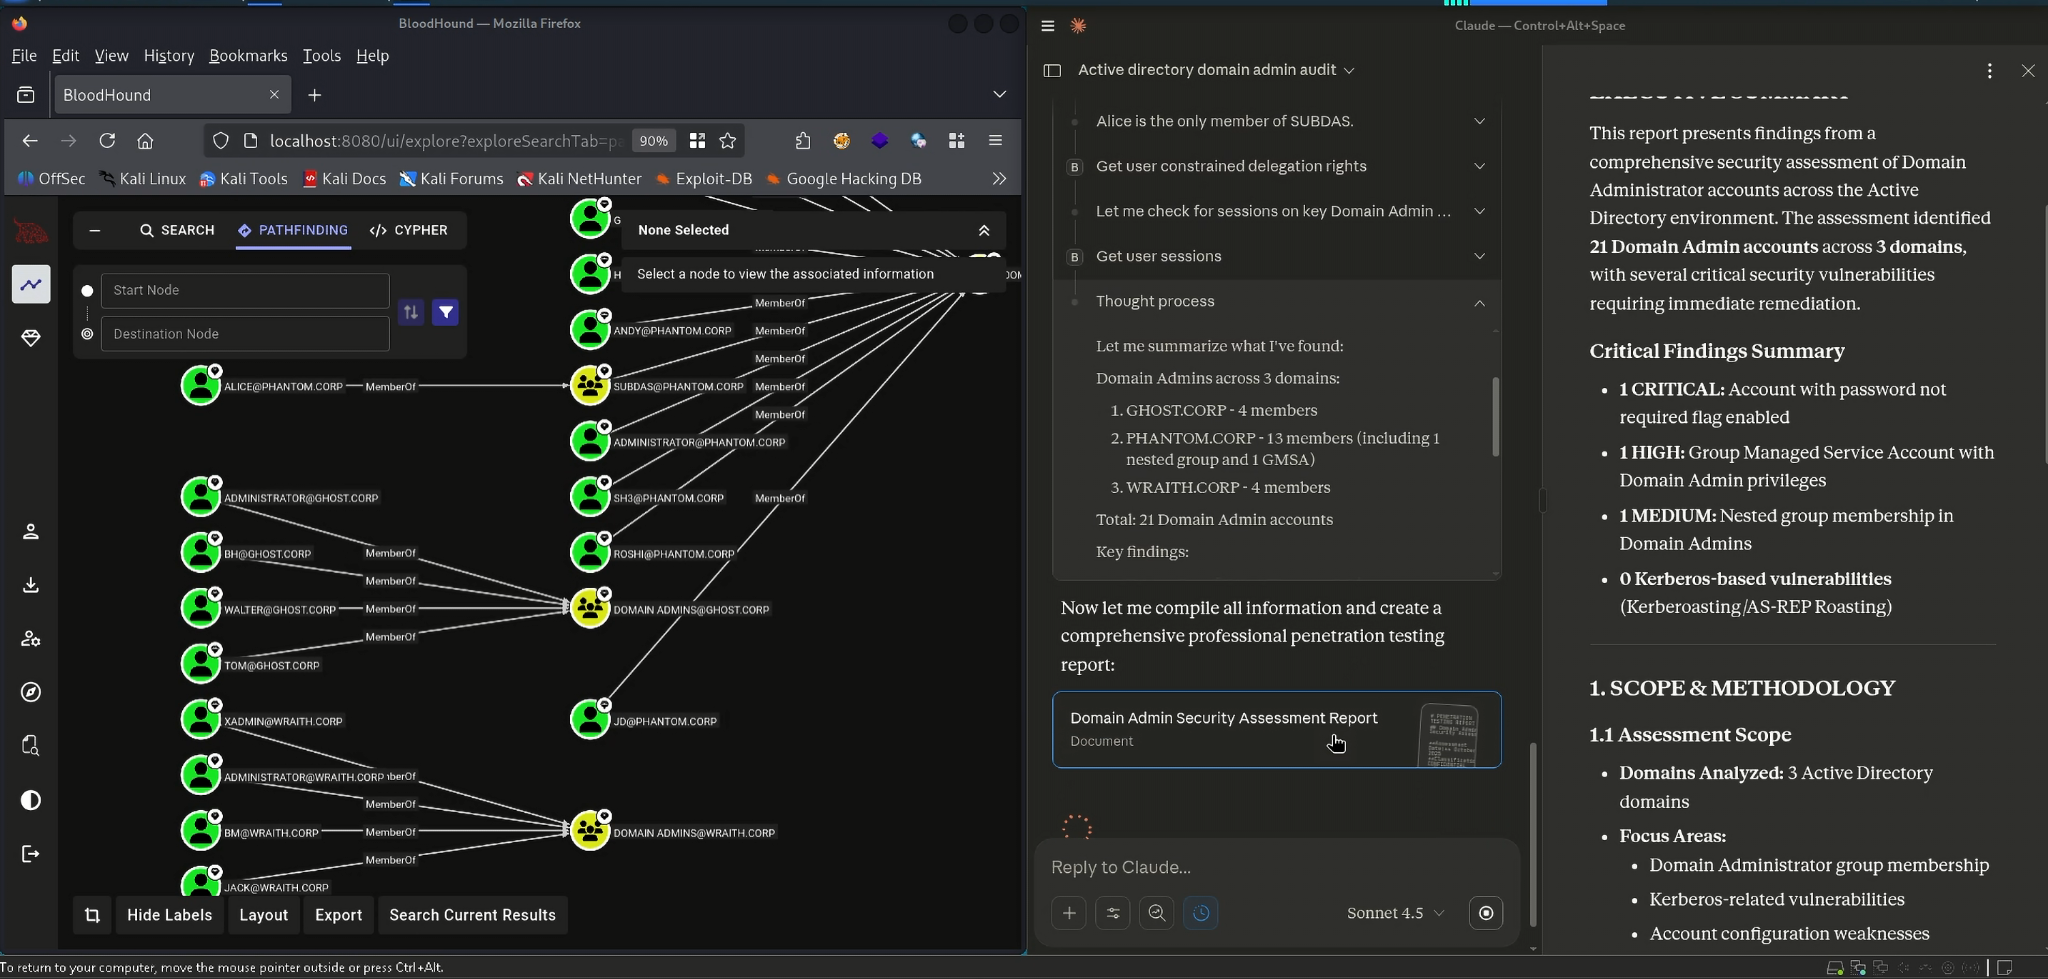
This tri-layer integration—Claude for reasoning, MCP for translation and BloodHound CE for data—turned privilege analysis into an iterative conversation. Instead of switching constantly between UI panes, Cypher queries and JSON exports, the analysis flowed naturally from high-level questions down to attribute-level details. The final results were compiled into a report that captured key misconfigurations, privilege chains and remediation priorities, all derived from conversational exploration of the sample dataset3.
 Claude & Bloodhound MCP Server Usage - Analyze Active Directory file from BloodHound Data
 Claude & Bloodhound MCP Server Usage - Created Vulnerability Report (1)
 Claude & Bloodhound MCP Server Usage - Created Vulnerability Report (2)
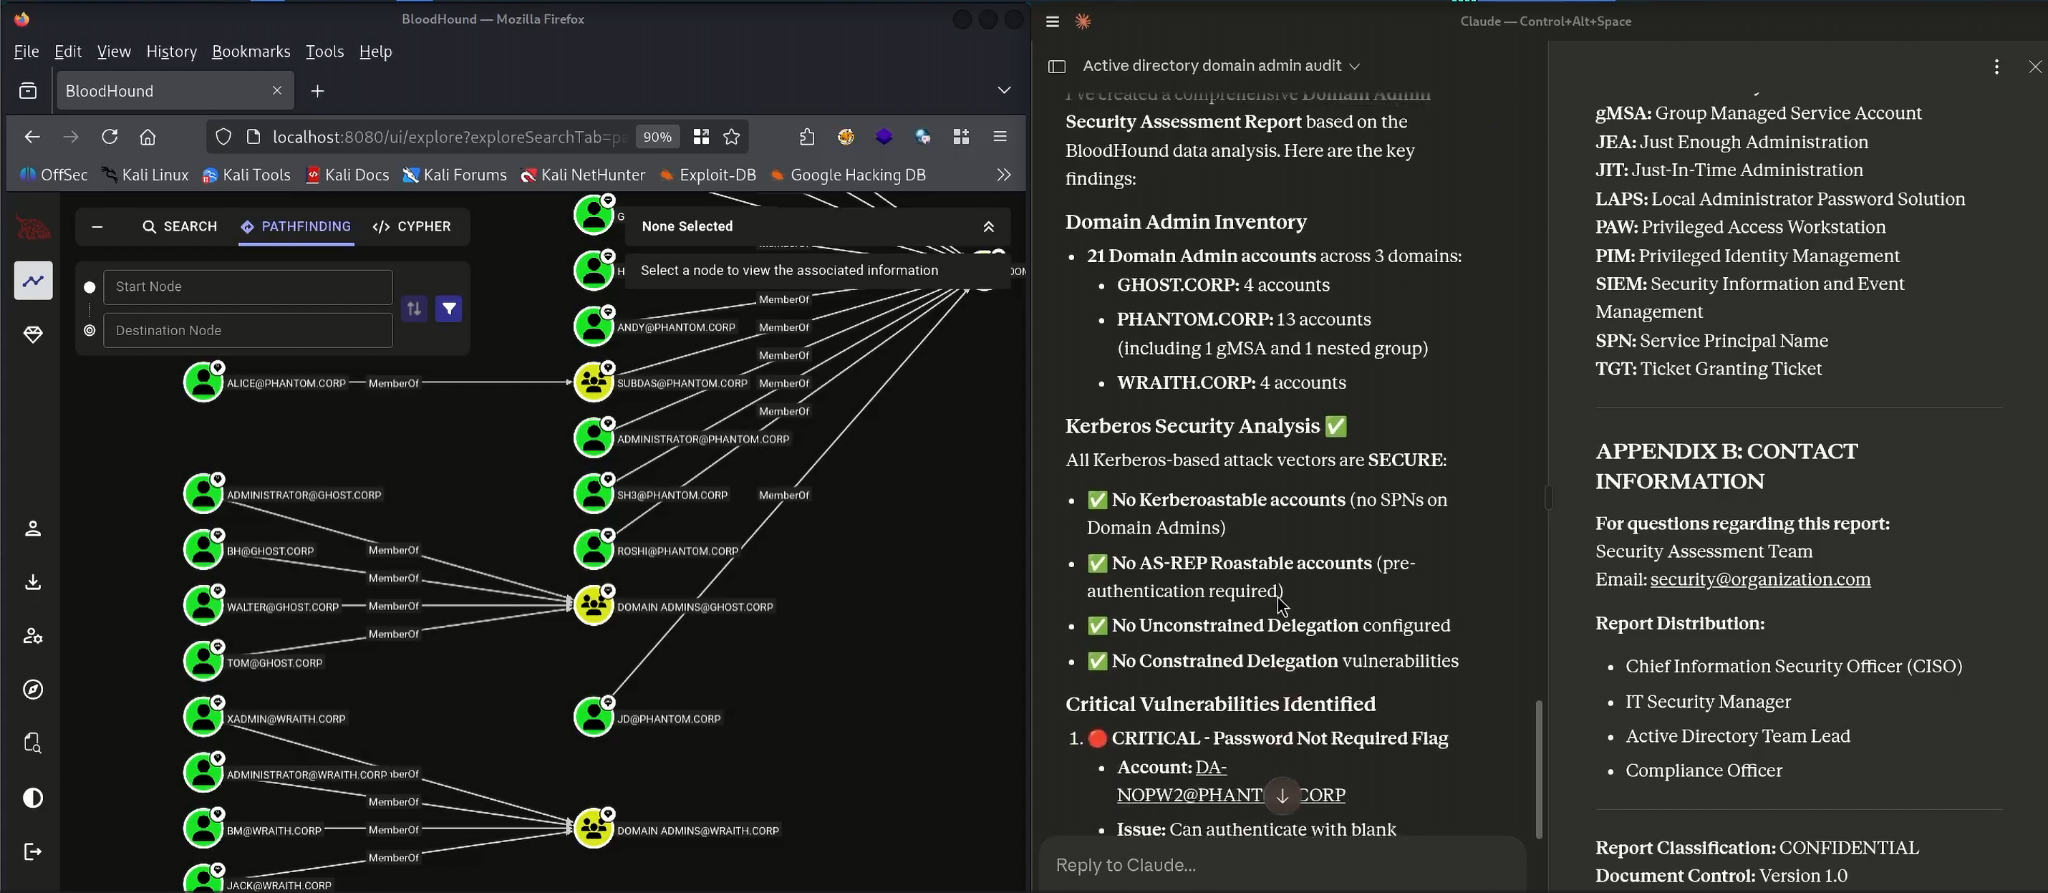 Claude & Bloodhound MCP Server Usage - Created Vulnerability Report (3)
Security Notes
Even though this walkthrough uses the BloodHound Community Edition sample data3, the findings highlight exactly the kinds of privilege issues that appear in real environments. Privilege sprawl, nested inheritance, over-privileged service accounts and misconfigured authentication settings all contribute to unnecessary attack paths. The sample 3dataset provides a safe place to practice identifying them. It demonstrates the importance of continually reviewing high-privilege groups, documenting nested structures, auditing service accounts and validating user attributes that may bypass normal security requirements.
Conclusion
This analysis shows how BloodHound, combined with MCP automation, transforms Active Directory privilege investigation into a structured and replicable process. The BloodHound Community Edition sample data3 provides a realistic model for practicing graph-based privilege analysis without requiring domain access. By visualizing groups, tracking privilege flow and inspecting attributes, it becomes possible to understand not only who has administrative power, but why they have it and how that access evolved. The sample dataset includes privilege sprawl, misconfigurations and service account issues—precisely the scenarios security teams encounter in real environments—which makes it an excellent foundation for hands-on learning and assessment practice.
Reference
-
“Chatting with Your Attack Paths: An MCP for BloodHound”- https://specterops.io/blog/2025/06/04/chatting-with-your-attack-paths-an-mcp-for-bloodhound/ ↩︎ ↩︎2 ↩︎3
-
“BloodHound Model Context Protocol Server”-https://github.com/mwnickerson/bloodhound_mcp ↩︎ ↩︎2 ↩︎3 ↩︎4
-
“BloodHound Community Edition Sample Data”-https://bloodhound.specterops.io/get-started/quickstart/ce-ingest-sample-data ↩︎ ↩︎2 ↩︎3 ↩︎4 ↩︎5